
How pool heat pumps work
Pool heat pumps are becoming increasingly popular, and for good reason. Unlike gas heaters that burn fuel to generate heat, or electric resistance heaters that directly convert electricity into heat, heat pumps move heat from one place to another. They extract heat from the surrounding air – even on cool days there's usable heat energy – and transfer it to your pool water. This makes them significantly more efficient than other heating options.
Think of it like a refrigerator in reverse. A refrigerator pulls heat from inside the unit and releases it into your kitchen. A heat pump pulls heat from the air and releases it into your pool. This process uses electricity, but far less than directly creating heat. For every one unit of electricity used, a heat pump can deliver three to six units of heat energy. That efficiency translates to lower energy bills over time.
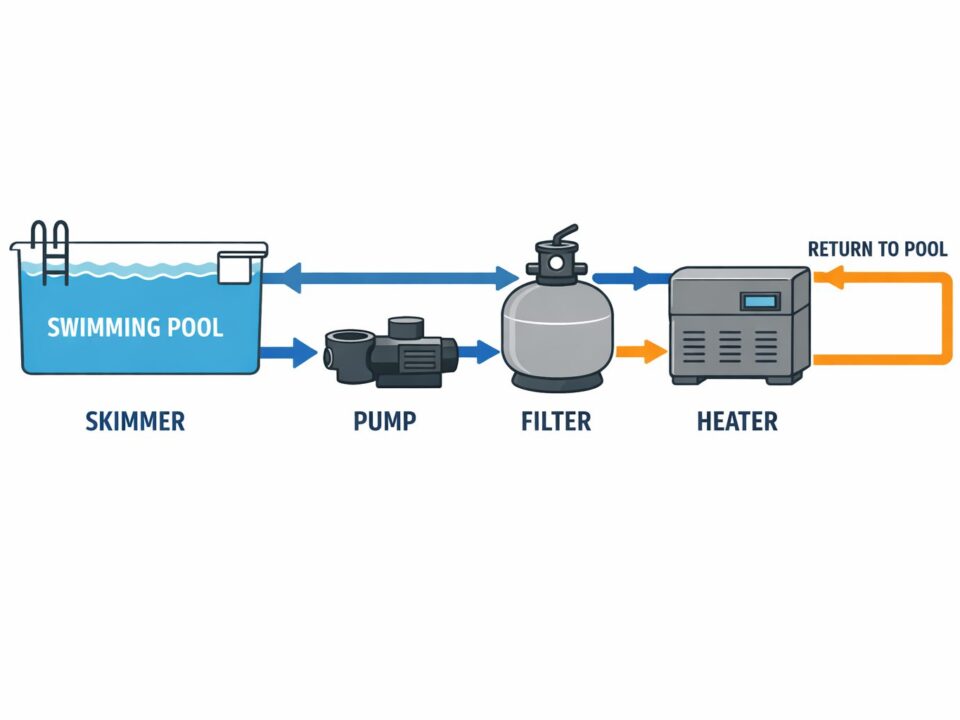
A typical heat pump consists of four main components: the evaporator coil, the compressor, the condenser coil, and the expansion valve. The evaporator absorbs heat from the air, the compressor increases the temperature of the refrigerant, the condenser releases heat into the pool water, and the expansion valve regulates the refrigerant flow. It's a closed-loop system, continuously cycling refrigerant to transfer heat. While the thermodynamics can be complex, the basic principle is surprisingly straightforward.
Choosing a heat pump isn’t just about saving money. They’re also generally considered more environmentally friendly than gas heaters, producing fewer greenhouse gas emissions. The initial investment can be higher, but the long-term operating costs are often lower, and you contribute to a smaller carbon footprint. It's a decision that balances upfront cost with ongoing savings and environmental responsibility.
Catching problems with regular inspections
Maintenance keeps your pool heat pump running without a massive repair bill later. I've found that a simple schedule—monthly, quarterly, and annual—is enough to catch most issues before they break the system.
A monthly visual check should be a quick walk-around. Look for obstructions around the unit – leaves, branches, or debris blocking airflow. Listen for unusual noises – rattling, hissing, or grinding sounds can indicate a problem. Check for any visible signs of refrigerant leaks, such as oily residue. These are simple checks any pool owner can perform.
Your quarterly check should be a little more detailed. Inspect the electrical connections for corrosion or looseness. Clean the air filter – a dirty filter restricts airflow and reduces efficiency. Visually inspect the fan blades for damage. These checks require a bit more attention but are still within the capabilities of a reasonably handy homeowner. Don’t attempt electrical work if you're not comfortable with it.
You need a professional once a year. They check refrigerant levels and the compressor in ways a homeowner can't. A 2022 study by the Pool & Hot Tub Alliance showed that this kind of proactive care can add 30% to the pump's lifespan. It's cheaper than buying a new unit three years early.
- Monthly: Check for leaves or leaks and listen for weird noises.
- Quarterly: Check electrical connections, clean air filter, inspect fan blades.
- Annually: Professional servicing – refrigerant level check, compressor inspection, control system testing.
The impact of airflow on efficiency
Airflow is often overlooked, but it’s arguably the most important factor affecting heat pump performance. These units are designed to draw air across the evaporator coil, and if that airflow is restricted, efficiency plummets. A restricted airflow forces the compressor to work harder, leading to overheating and premature failure. It’s a surprisingly common issue, and one that's often easily addressed.
The evaporator coil is where the heat pump absorbs heat from the air. If this coil is dirty or obstructed, the heat transfer process is significantly reduced. Regularly check the coil for leaves, dirt, and other debris. You can gently clean the coil with a soft brush or a garden hose – but always disconnect the power first. Pay close attention to the fins; they’re delicate and easily bent.
To check for airflow restrictions, visually inspect the area around the unit. Are there bushes or trees growing too close? Trim any vegetation that’s blocking airflow. Ensure there’s adequate clearance on all sides of the unit – at least two feet is recommended. You can also feel for airflow with your hand. A strong, consistent airflow indicates good performance; a weak or uneven airflow suggests a problem. A failing fan motor will also dramatically reduce airflow.
A compromised fan motor is a frequent cause of airflow issues. Listen for unusual noises coming from the fan, and visually inspect the fan blades for damage. If the fan isn’t spinning freely, or if it’s making loud noises, it likely needs to be replaced. Ignoring a faulty fan motor will only exacerbate the problem and potentially damage the compressor.
Water chemistry and corrosion
Pool water chemistry directly impacts the lifespan of your heat pump. Improperly balanced water can lead to corrosion of the heat exchanger and other components, significantly reducing its efficiency and potentially causing a complete failure. Maintaining proper water chemistry isn’t just about swimmer comfort; it’s about protecting your investment.
pH levels should be maintained between 7.2 and 7.8. High pH can cause scaling, while low pH can lead to corrosion. Alkalinity should be between 80 and 120 ppm, and calcium hardness between 200 and 400 ppm. Salt levels, if you have a saltwater pool, should be within the manufacturer’s recommended range – typically between 2700 and 3400 ppm. Regularly test your water and adjust the chemicals as needed.
Corrosion is a major concern for heat pumps. The heat exchanger, in particular, is vulnerable to corrosion if the water chemistry is off. Regularly inspect the heat exchanger for signs of corrosion, such as pitting or discoloration. Some heat pumps utilize sacrificial anodes, which corrode instead of the heat exchanger. These anodes should be inspected annually and replaced when necessary.
Chemistry isn't a one-time fix. If you don't want to test the water manually every week, an automatic controller handles the readings for you. It's a boring task, but it stops the hardware from rotting.
- pH: 7.2 to 7.8
- Alkalinity: 80 - 120 ppm
- Calcium Hardness: 200 - 400 ppm
- Salt Level (Saltwater Pools): 2700 - 3400 ppm
Pool Water Chemistry Parameters & Heat Pump Impact
| Parameter | Ideal Range | Potential Impact on Heat Pump | Recommended Action |
|---|---|---|---|
| pH | 7.2 - 7.8 | Imbalance can accelerate corrosion of heat exchanger components. Low pH (acidic) is particularly damaging. | Regularly test and adjust pH using appropriate chemicals. Maintain within the ideal range. |
| Total Alkalinity | 80 - 120 ppm | Low alkalinity leads to pH fluctuations, increasing corrosion risk. High alkalinity can cause scaling. | Maintain alkalinity within the ideal range for stable pH and to prevent scaling. |
| Calcium Hardness | 200 - 400 ppm | Low calcium hardness can cause water to become corrosive, damaging heat pump materials. High levels can lead to scaling. | Test and adjust calcium hardness as needed. Balance is crucial for heat pump protection. |
| Cyanuric Acid (Stabilizer) | 30 - 50 ppm | While primarily for chlorine stabilization, extremely high levels can reduce heat transfer efficiency. | Monitor cyanuric acid levels and maintain within the recommended range. Partial water changes may be needed to lower levels. |
| Salt (for Saltwater Pools) | 2700 - 3400 ppm (varies by cell manufacturer) | Outside the recommended range can damage the salt chlorine generator and potentially the heat pump's heat exchanger due to altered water chemistry. | Follow the salt chlorine generator manufacturer's recommendations for salt levels. Regular testing is essential. |
| Dissolved Solids | Below 1500 ppm | High dissolved solids contribute to scaling and reduced heat transfer efficiency, potentially shortening the lifespan of the heat pump. | Regularly monitor total dissolved solids and consider partial water replacement if levels become excessive. |
Illustrative comparison based on the article research brief. Verify current pricing, limits, and product details in the official docs before relying on it.
Troubleshooting common issues
Even with regular maintenance, you may encounter issues with your pool heat pump. Knowing how to troubleshoot common problems can save you time and money. However, it’s crucial to remember that some repairs should only be performed by a qualified technician. Safety first!
Heat pump not heating: Check the power supply, ensure the thermostat is set correctly, and verify that the unit isn’t in defrost mode. If these checks don’t resolve the issue, there may be a problem with the compressor or refrigerant levels – call a professional. Weak heating: This often indicates reduced airflow or low refrigerant levels. Clean the air filter and check for obstructions. If the problem persists, contact a technician. Unusual noises: Rattling sounds could indicate loose components, hissing sounds suggest a refrigerant leak, and grinding sounds point to a potential compressor problem. In any case, shut off the unit and call a professional.
Many heat pumps have built-in error codes that can help diagnose problems. Consult your owner’s manual for a list of error codes and their corresponding meanings. Common codes might indicate a sensor failure, a refrigerant leak, or a compressor issue. Don’t attempt to fix the problem yourself if you don’t understand the error code – call a technician.
When to call a professional: Refrigerant leaks are a serious issue and require specialized equipment and training to repair. Compressor problems are also best left to the experts. Electrical issues should always be handled by a qualified electrician. Attempting repairs you're not qualified for can be dangerous and may void your warranty. Remember, it’s better to be safe than sorry.
Winterizing your heat pump
Proper winterization is essential for protecting your heat pump from damage during freezing temperatures. Failing to winterize your unit can lead to cracked heat exchangers, frozen pipes, and costly repairs. The specific steps involved will depend on your climate and the manufacturer’s recommendations.
In colder climates, the process typically involves shutting off the power to the unit, draining all water from the heat exchanger and pipes, cleaning the evaporator coil, and covering the unit with a waterproof cover. It’s also a good idea to disconnect the electrical connections to prevent corrosion. Follow the manufacturer’s instructions carefully, as they may have specific recommendations for your model.
If you live in a milder climate where temperatures rarely drop below freezing, you may not need to completely winterize your heat pump. However, it’s still important to protect the unit from the elements. Cover the unit with a waterproof cover and ensure that the area around it is clear of debris. Consider running the pump periodically throughout the winter to prevent condensation from building up inside the unit.
Always consult your owner’s manual for specific winterization instructions. Different models may have different requirements. Ignoring the manufacturer’s recommendations can void your warranty and potentially damage your heat pump.
- Shut off power to the unit.
- Drain all water from the heat exchanger and pipes.
- Clean the evaporator coil.
- Cover the unit with a waterproof cover.
Finding a Qualified Technician
Choosing the right technician is crucial for ensuring the proper maintenance and repair of your pool heat pump. Not all technicians are created equal, so it’s important to do your research and find someone who is qualified and reputable.
Look for technicians who are certified by organizations like the Pool & Hot Tub Alliance (PHTA) or have a Certified Pool Operator (CPO) certification. These certifications demonstrate a level of knowledge and expertise. Ask potential technicians about their experience working with heat pumps specifically. Don’t hesitate to ask for references from previous clients.
Before hiring a technician, get multiple quotes and compare services. Be sure to ask about their hourly rates, service fees, and warranty policies. Make sure they are properly licensed and insured. A reputable technician will be happy to provide you with this information.
Resources for finding certified pool professionals include the PHTA website () and your local building department. Taking the time to find a qualified technician can save you a lot of headaches – and money – in the long run.
No comments yet. Be the first to share your thoughts!