
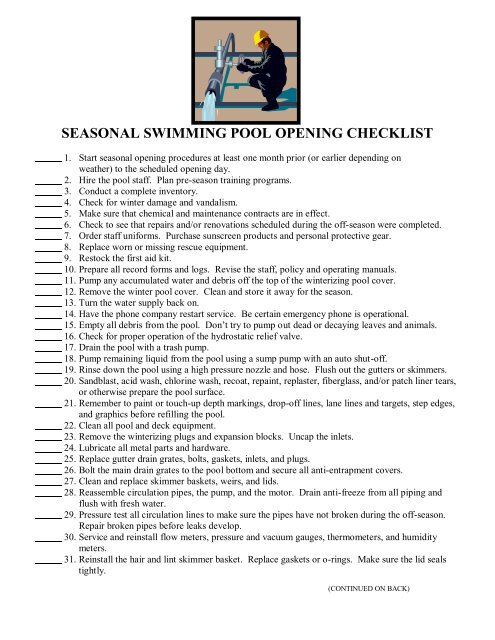
Spring Pool Opening: A 2026 Checklist
Spring means getting your pool ready for swimming season. This isn't just about removing the cover; it's a comprehensive check-up to ensure everything functions safely and efficiently. Many homeowners face increased costs for pool chemicals and repairs, a trend that started in late 2023 and continues into 2024. Proactive maintenance now can reduce unexpected expenses later.
A systematic approach is key to a smooth opening. Remove all debris that accumulated over winter – leaves, branches, and other unwanted materials. Inspect the pool's structure for visible damage. Assess your equipment and supplies to ensure you have everything needed for the season.
Addressing minor issues early prevents them from becoming major problems. A small crack in the plaster can worsen and require costly resurfacing. A failing pump can lead to more extensive damage if left unattended. If you feel overwhelmed, seek professional help. Local pool services can assist with opening, inspection, or repairs, saving you time, money, and potential headaches.

Water Chemistry: Testing & Balancing
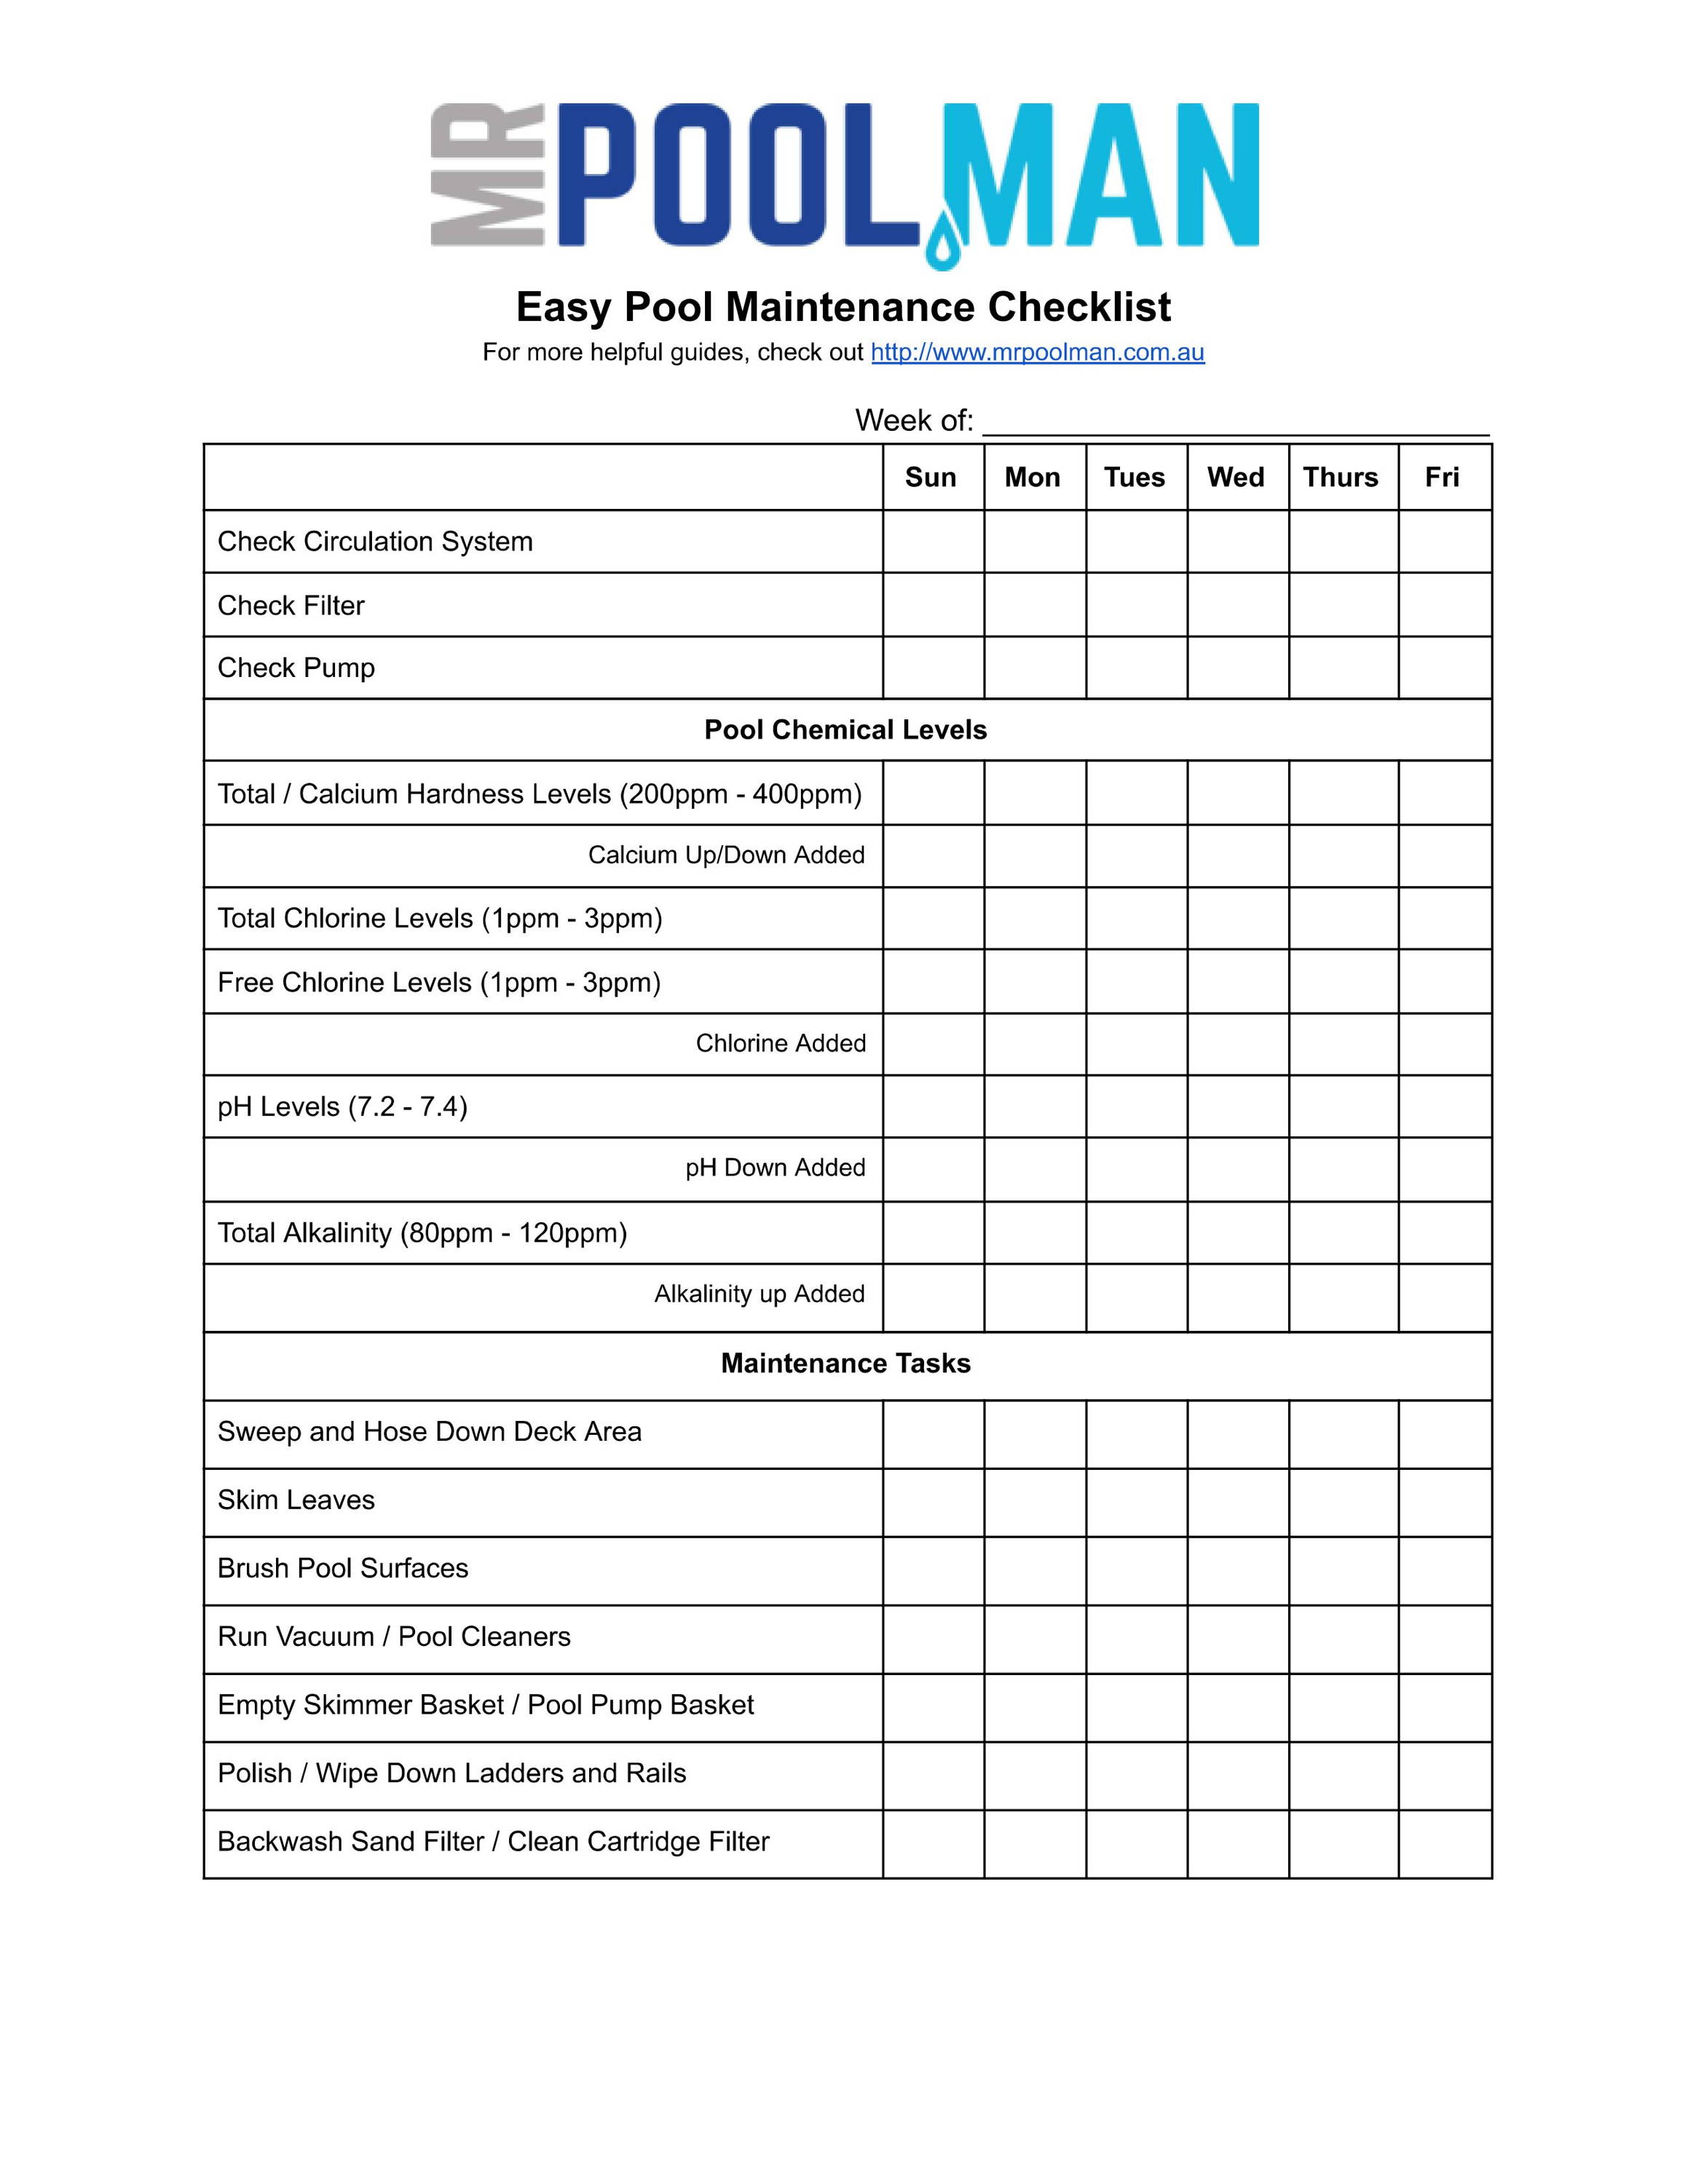
Once the pool is physically clean, focus on water chemistry. Proper water balance is essential for swimmer safety, equipment longevity, and pool clarity. The five key parameters to monitor are pH, alkalinity, calcium hardness, cyanuric acid (stabilizer), and chlorine levels. Each plays a distinct role in maintaining a healthy swimming environment.
pH measures water acidity or alkalinity, with an ideal range of 7.2 to 7.8. Too low, and the water becomes corrosive, damaging pool surfaces and equipment. Too high, it can cause scaling, cloudiness, and reduced chlorine effectiveness. Alkalinity acts as a pH buffer, preventing drastic swings. Calcium hardness indicates dissolved calcium; low levels can cause etching, while high levels lead to scaling. Cyanuric acid protects chlorine from sunlight degradation, and chlorine is the primary sanitizer, killing bacteria and algae.
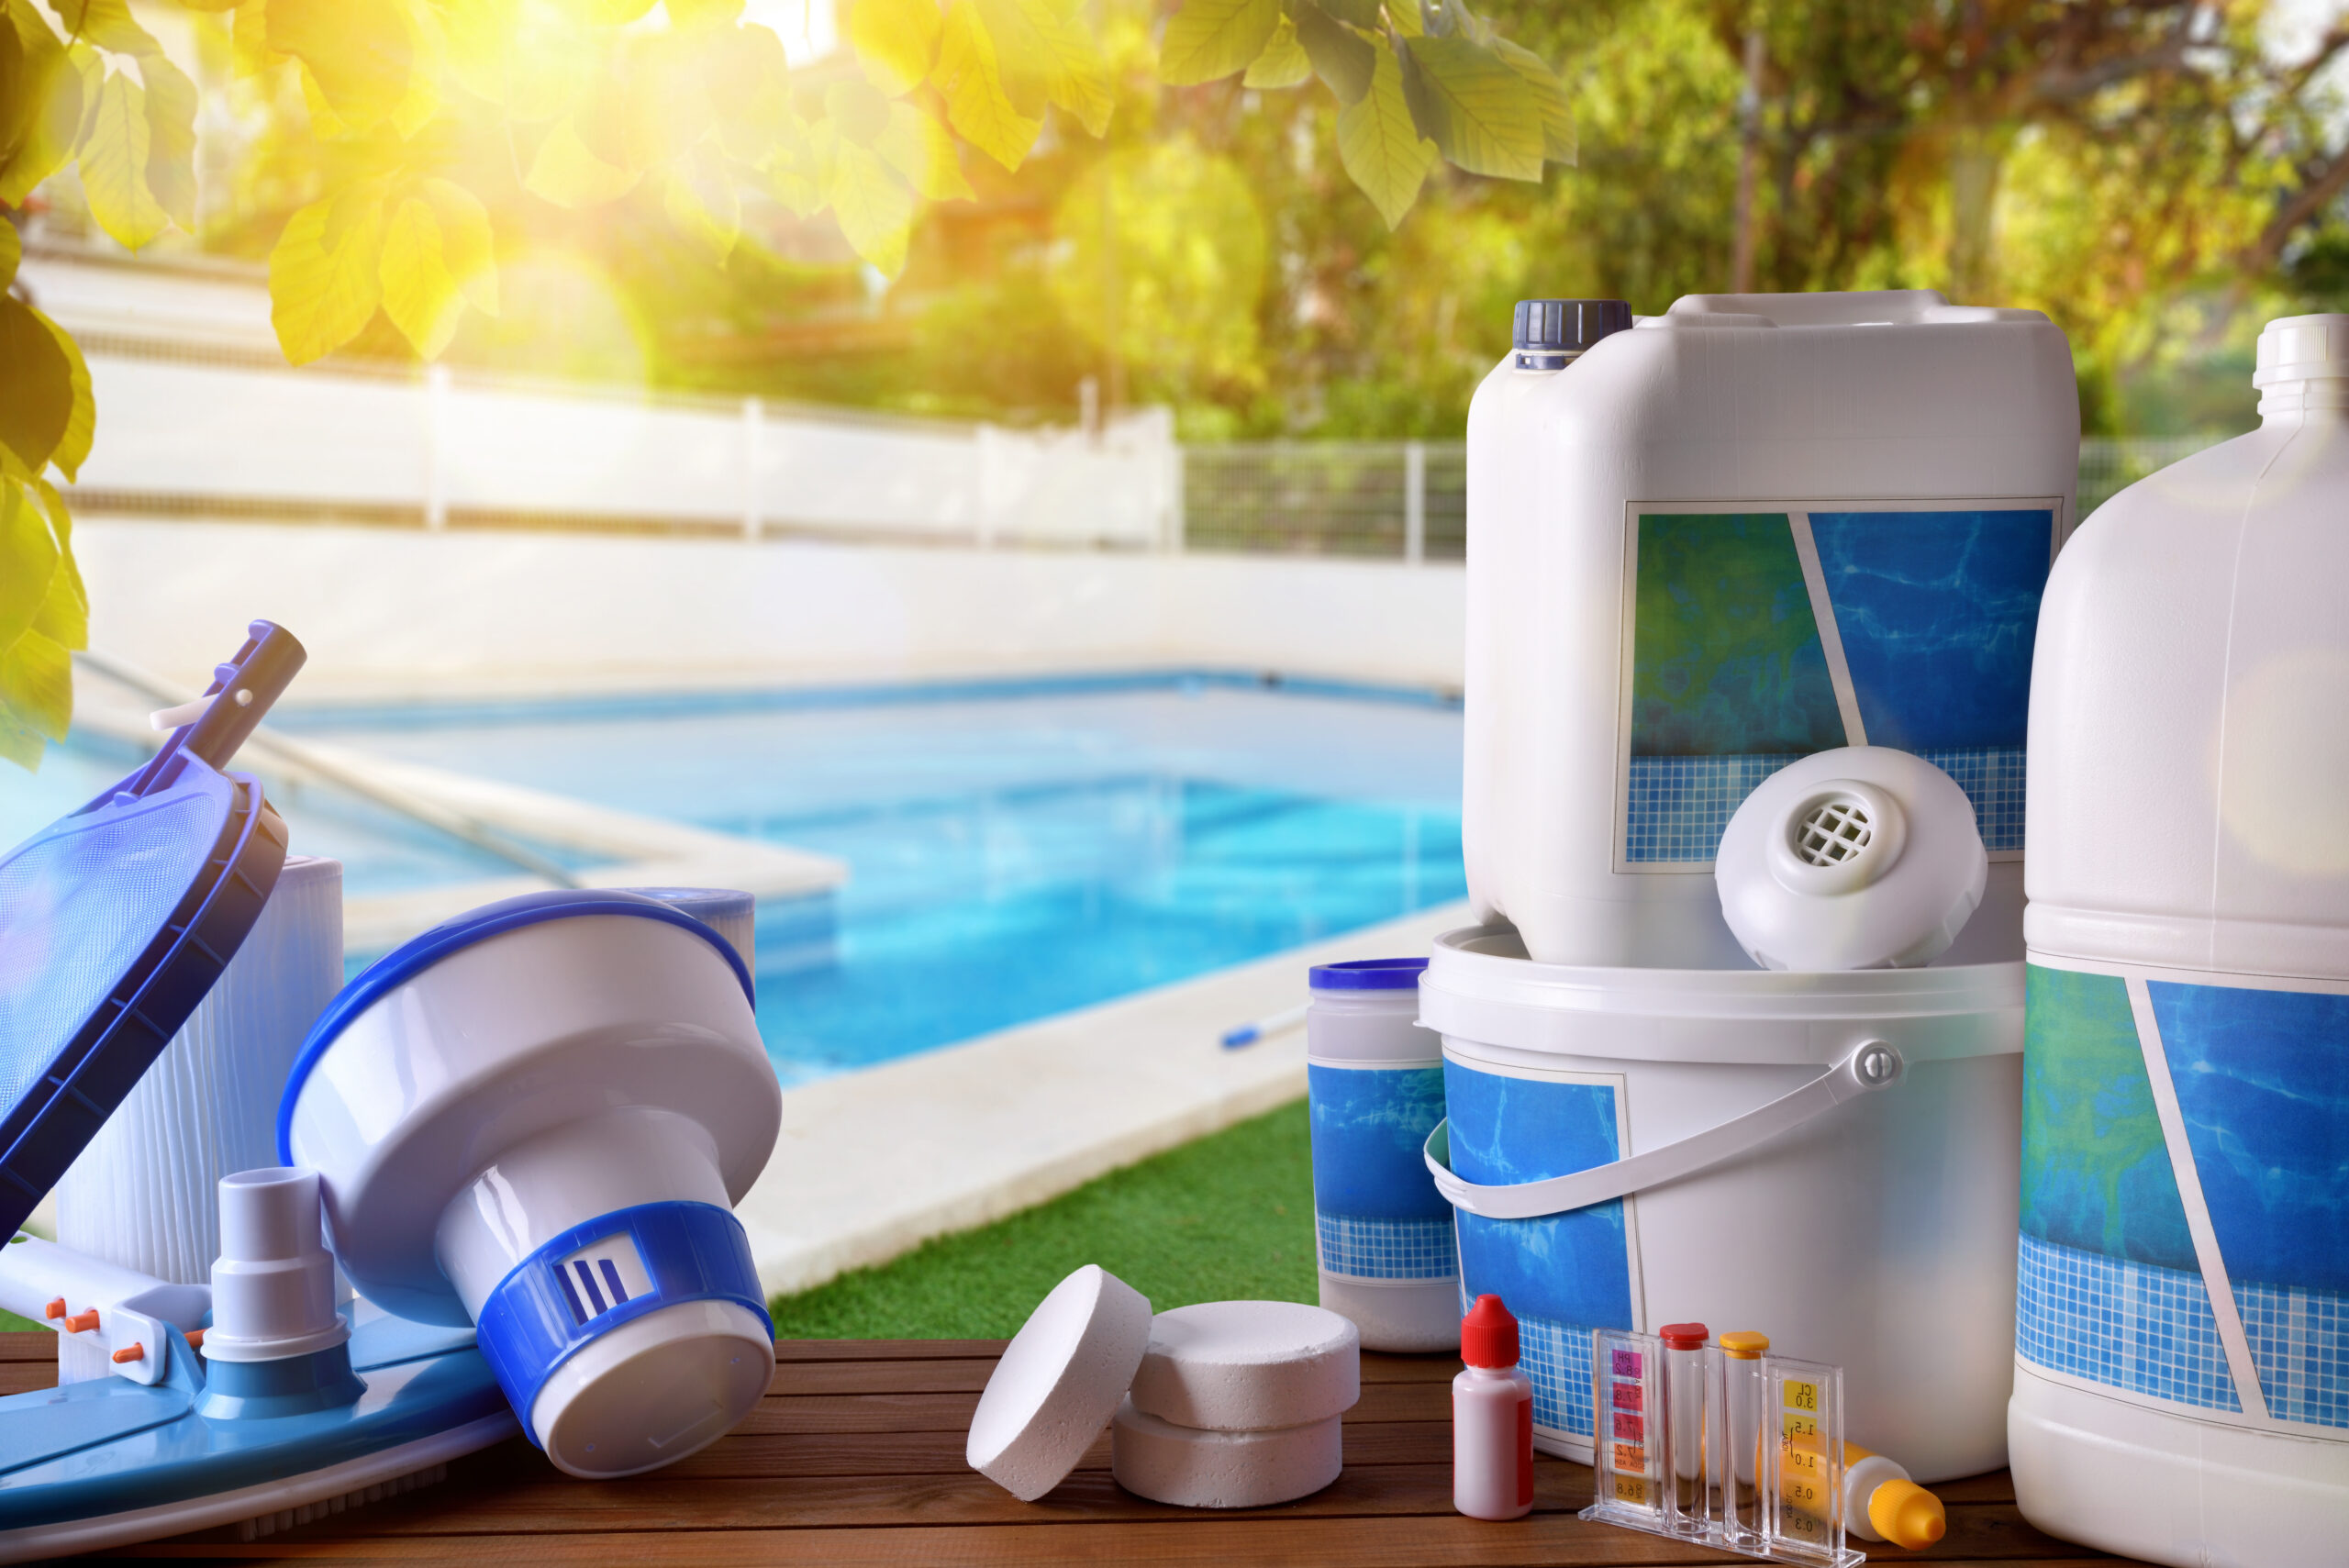
For testing, you have options: liquid test kits and test strips. Strips are convenient, but liquid kits are generally more accurate, especially for detecting subtle imbalances. Invest in a reliable liquid test kit – they’re relatively inexpensive and provide more precise readings. The rising cost of chlorine has also prompted many pool owners to explore alternative sanitizers, such as salt systems, which generate chlorine through electrolysis. These systems require an initial investment but can offer long-term savings and a more consistent chlorine level.
- pH: 7.2 - 7.8
- Total Alkalinity: 80 - 120 ppm
- Calcium Hardness: 200 - 400 ppm
- Cyanuric Acid: 30 - 50 ppm
- Free Chlorine: 1 - 3 ppm
Equipment Inspection: Motors, Pumps & Filters
Thorough equipment inspection is essential for spring pool opening. Start with the pump. Check for leaks around the pump housing, connections, and seals. Listen for unusual noises – grinding, squealing, or rattling – which could indicate a failing motor or impeller. Examine the filter. For sand filters, inspect the tank for cracks and ensure the sand hasn’t become clumped or channeled. Cartridge filters should be inspected for tears or damage, and DE filters need their grids checked for rips.
Don't forget small details. Lubricate all O-rings with a silicone-based lubricant to prevent drying out and cracking. Check the pump strainer basket for debris and ensure it’s clean. Inspect the motor for signs of overheating or corrosion. A worn motor can draw excessive power and eventually fail, leading to a costly replacement. These inspections identify potential problems before they cause major headaches.
Ignoring preventative measures can lead to significant repair bills. Regular equipment maintenance is important. Professionals can provide a detailed assessment of your pool system and identify potential issues you might have missed. Finding a qualified technician is a smart investment.
Pool Surface & Tile: Cracks & Damage
Visually inspect the pool surface and tile. Look for cracks in the plaster, particularly around light fixtures, steps, and returns. Damaged tiles are common, often caused by expansion and contraction due to temperature fluctuations. Deteriorating coping – the cap around the pool edge – can also indicate underlying issues.
These problems aren’t just cosmetic. Cracks in the plaster can allow water to seep behind the shell, leading to structural damage. Damaged tiles can create sharp edges that pose a safety hazard. Causes include poor installation, age, soil movement, and harsh weather. Repair options range from patching small cracks to a complete resurfacing, depending on the damage severity.
Ignoring small cracks is a dangerous game. They almost always worsen over time, and repair costs increase exponentially. Address them promptly to prevent a minor issue from becoming a major expense. Assess the pool deck for safety. Is it even and free of tripping hazards? Consider resealing or repairing the deck surface to prevent slips and falls.
Cleaning & Debris Removal: Beyond the Skimmer
Removing the cover is the first step in cleaning your pool. Thorough cleaning of the pool floor and walls is essential to remove accumulated dirt, algae, and debris. A manual vacuum is a good start, but automatic or robotic pool cleaners save time and effort. Robotic cleaners scrub walls and steps effectively, while automatic cleaners circulate water and collect debris.
For stubborn stains, use a pool stain remover designed for the specific stain – organic stains (leaves, algae) require different treatments than metallic stains (iron, copper). Be careful when using chemicals; always follow manufacturer’s instructions and avoid mixing products. Consider eco-friendly cleaning options to minimize environmental impact.
Proper winter cover removal and storage is also important. Clean the cover thoroughly before folding it and storing it in a dry, protected location. This will prevent mold and mildew from forming and extend the life of the cover. A well-maintained cover can save you money in the long run by reducing debris and chemical consumption.
Safety Checks: Barriers & Alarms
Pool safety is paramount. It’s not just about preventing accidents; it’s about legal responsibility. Most municipalities have specific regulations regarding pool fencing and barriers. Ensure your fence meets the required height and has a self-closing, self-latching gate. The latch should be out of reach of young children. Regularly inspect the fence for any damage or weaknesses.
Pool alarms are another crucial safety measure. There are several types available: surface wave alarms, sub-surface disturbance alarms, and wristband alarms. Choose an alarm that fits your needs and budget. Consider a layered approach to safety – a combination of fencing, alarms, and constant supervision.
Beyond physical barriers, CPR training is essential for all pool owners and caregivers. Knowing how to respond in an emergency can save a life. Be aware of the potential liability issues if your pool isn’t adequately secured. A tragic accident can have devastating consequences, both emotionally and financially.
Proactive Prevention: Long-Term Care
Opening your pool is just the beginning. Consistent, proactive maintenance is the key to long-term pool health and preventing future problems. Establish a regular schedule for skimming the surface, brushing the walls, and vacuuming the floor. Regularly test and balance the water chemistry – at least once a week, and more often during periods of heavy use or hot weather.
A well-maintained pool requires less chemical intervention, saving you money and reducing your environmental footprint. Regularly inspect your equipment for signs of wear and tear. Replace worn parts promptly to prevent breakdowns. Consider a professional pool service for routine maintenance and inspections. They can identify potential problems before they escalate.
Even in the spring, think ahead to winter. Starting to plan for winterization now – researching covers, understanding chemical needs – can make the process much smoother when the time comes. Extending the life of your pool equipment and preventing future issues is an investment that will pay dividends for years to come. It’s about enjoying a safe, clean, and worry-free swimming season.

No comments yet. Be the first to share your thoughts!