
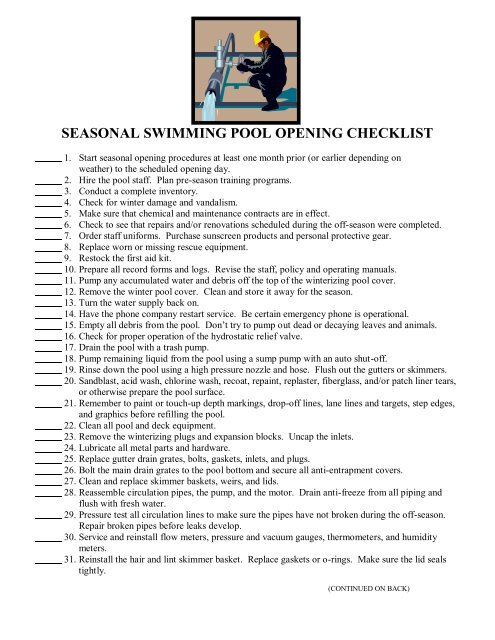
A realistic opening checklist
Most pools look rough after a winter under the cover. Before you jump in, you need to check for damage that happened while you weren't looking. It's better to find a crack now than after you've spent money on chemicals.
Start with a visual sweep. Look around the pool deck for any obvious hazards – cracks, loose tiles, or damaged coping. Then, check the area around the pool for things that might have shifted during the winter. Is anything leaning precariously? Is there debris that could fall in?
Turn off the power at the breaker before you touch anything. You don't want the pump kicking on while you're working. The Illinois Department of Public Health has a long list of safety codes on their site, but for now, just make sure the power is dead so you can look at the hardware safely.
Don’t feel pressured to do everything yourself immediately. This initial walkthrough is about identifying potential issues. A simple visual inspection can reveal a lot – a cracked skimmer, a damaged light, or a general state of disrepair. Make notes of anything concerning. You can always call in a professional for a more detailed inspection later.

Cleaning and removing the cover
Removing the pool cover is the next logical step, but don't just rip it off. First, clean it. A dirty cover will dump all that accumulated grime directly into your pool, creating a bigger mess. Use a brush and garden hose to remove leaves, dirt, and other debris before you start the removal process.
The removal process itself depends on the type of cover you have. A simple tarp-style winter cover can usually be pulled off by hand, though it might require two people. Safety covers, which are more secure and designed to prevent accidental entry, have a more complex removal system – usually involving straps and anchors. Always follow the manufacturer's instructions.
Once the cover is off, properly store it. Fold it neatly and store it in a dry, well-ventilated area. Avoid storing it directly on the ground, as this can lead to mildew and damage. Inspect the cover for any tears or damage. If it's brittle or significantly damaged, it's time to replace it. Proper disposal of old covers is important; check with your local waste management authority for guidelines.
Don't underestimate the importance of cover condition. A failing cover isn't just an eyesore; it’s a safety hazard. Replacing a worn-out cover is a relatively small investment compared to the potential cost of an accident.
Water levels and plumbing
With the cover removed, you’ll likely notice the water level is lower than usual. This is normal. Water evaporates over the winter, and some may have been lost due to leaks or rainfall. Slowly add water using a garden hose. Avoid adding water too quickly, as this can put stress on the pool structure.
Consider your water source. Well water can contain minerals that affect water chemistry, while city water is typically treated. Knowing your water source helps you anticipate potential imbalances. Monitor the water level carefully as you fill it, stopping a few inches below the skimmer opening.
Now, visually inspect the plumbing. Look for cracks in the pipes around the pump and filter. Check the skimmer baskets and pump baskets for leaves, debris, or other obstructions. Clear out any blockages. A clogged skimmer basket can restrict water flow and damage the pump.
Crucially, before you power up the system, check for leaks. Look for wet spots around the pump, filter, and plumbing connections. D&L Pools (dandlpools.com) offers maintenance contracts that include thorough plumbing inspections, which can be a good option if you're unsure about checking everything yourself. Catching a leak now, before the system is running, can save you a lot of money and headaches.
Equipment Inspection: Pump, Filter, and Heater
With the plumbing checked, turn your attention to the core equipment: the pump, filter, and heater. Start with the pump. Look for any visible cracks in the pump housing. Check the motor for signs of rust or corrosion. Inspect the impeller housing for damage. A damaged impeller can significantly reduce pump performance.
Next, examine the filter. Check the pressure gauge. A normal reading will vary depending on the filter type, but generally, it should be within the manufacturer's recommended range. Inspect the filter tank for cracks or damage. If you have a sand filter, check the sand level and condition. For cartridge or DE filters, inspect the cartridge or grids for tears or clogs.
Finally, inspect the heater (if you have one). Visually check for corrosion, especially around the gas lines (if it's a gas heater). Look for any obvious signs of damage. Never attempt to repair a gas heater yourself; this should always be done by a qualified technician.
Remember, this is a visual inspection. Don’t disassemble anything or attempt repairs if you’re not comfortable. The goal is to identify obvious problems that might require professional attention. A little preventative maintenance now can prevent a major breakdown later.
- Pump: Check for cracks, rust, impeller damage
- Filter: Inspect gauge, tank, and filter media
- Heater: Look for corrosion, damage to gas lines (if applicable)
Testing and shocking the water
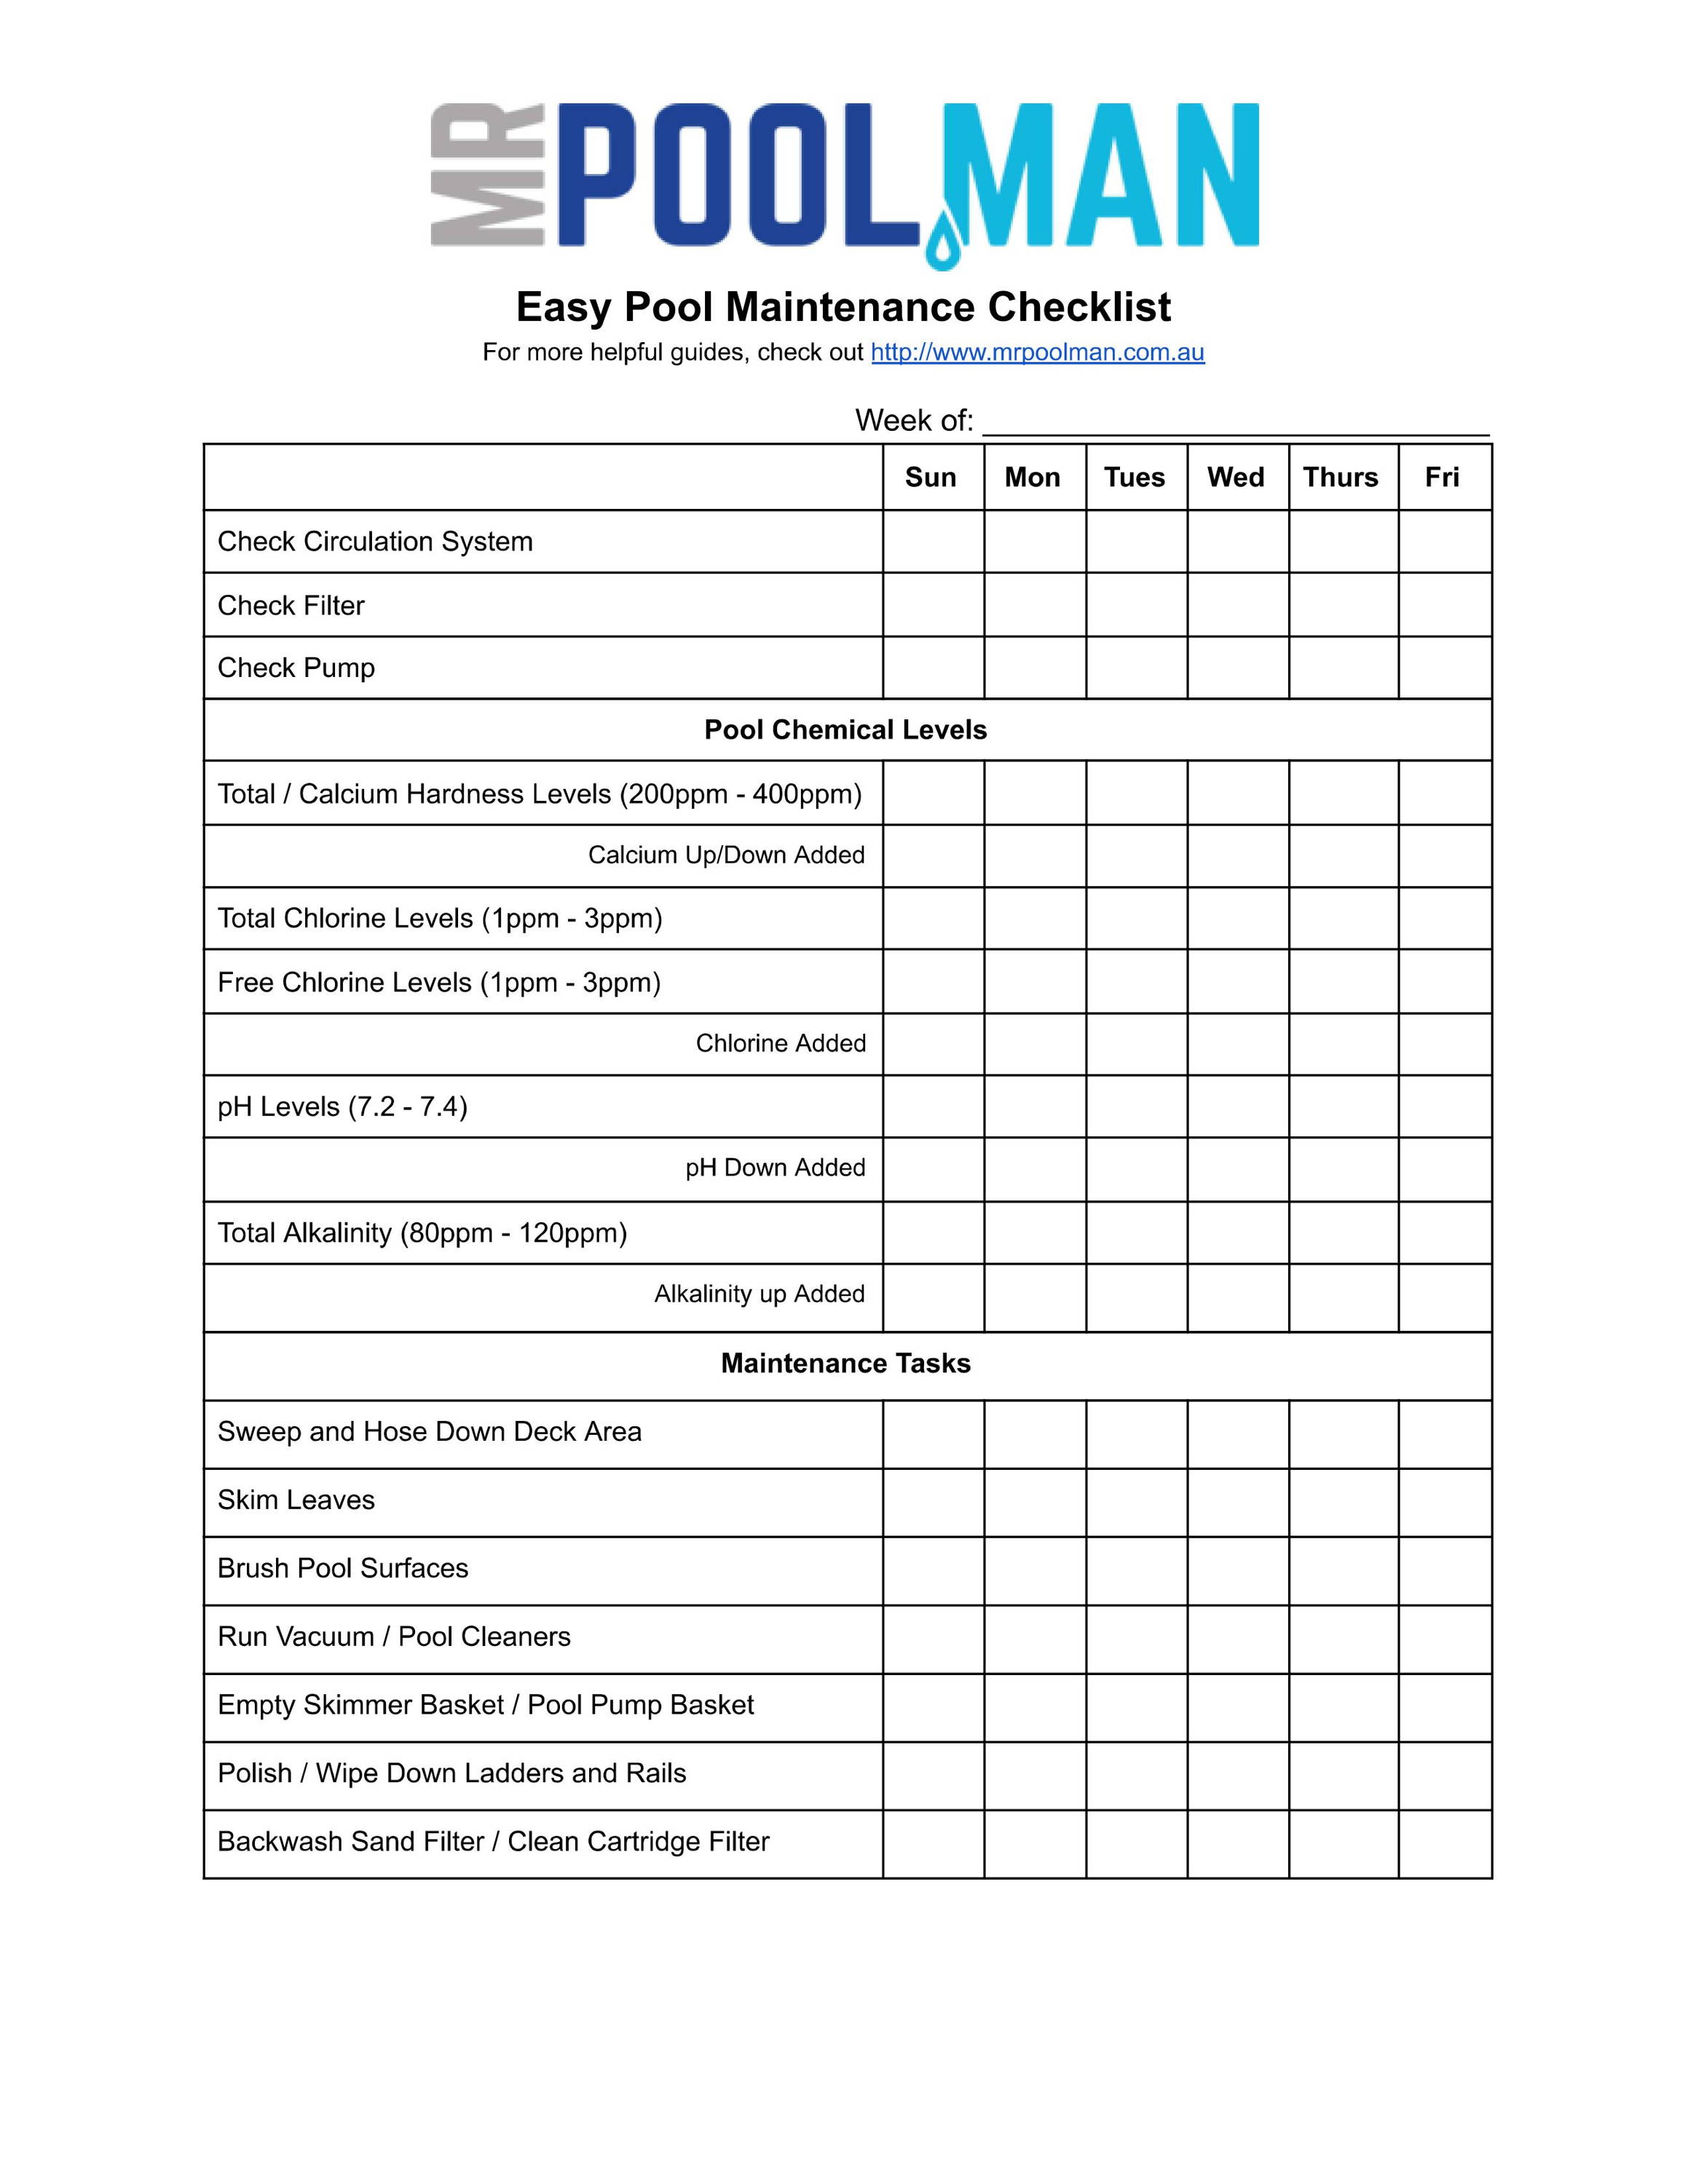
Before you add any chemicals, test the water. This is non-negotiable. Use a reliable test kit or take a water sample to a pool supply store for professional analysis. You need to know the current levels of pH, alkalinity, calcium hardness, and cyanuric acid (stabilizer).
Ideal ranges vary, but generally: pH should be between 7.2 and 7.8, alkalinity between 80 and 120 ppm, calcium hardness between 200 and 400 ppm, and cyanuric acid between 30 and 50 ppm. These levels are crucial for water clarity, swimmer comfort, and equipment protection.
Once you have your test results, shocking the pool is typically the first step. Shocking involves adding a high dose of sanitizer to kill bacteria and algae that may have accumulated over the winter. Calcium hypochlorite is a common choice, but dichlor and other options are available. Always follow the manufacturer's instructions carefully.
Be careful with the chemicals. Don't mix them together, and always pour the chemicals into the water rather than spraying water into a bucket of powder. Wear gloves and glasses. Keep the pump running for eight hours so the shock actually reaches every corner of the pool.
Startup and Circulation: Running the System
After shocking, it’s time to start up the system. Turn on the pump and carefully monitor for leaks. Check all the plumbing connections again. Also, observe the filter pressure. It should gradually increase as the filter traps debris.
If you have a DE filter, you may need to backwash it after the initial circulation to remove accumulated debris. Follow the manufacturer's instructions for backwashing. The goal is to get the water circulating and the filter working efficiently.
Run the system continuously for at least 24 hours. This ensures that the chemicals are properly distributed and that any remaining debris is filtered out. After 24 hours, re-test the water. You may need to adjust the chemical levels to achieve the ideal balance.
Be prepared for potential issues. Cloudy water is common after opening, and it usually clears up with proper filtration and chemical balance. Algae growth can also occur, requiring additional treatment. Don’t panic; most issues are easily addressed with the right approach.
Troubleshooting Common Opening Issues
Cloudy water is often the first sign of trouble. It can be caused by a variety of factors, including unbalanced water chemistry, algae growth, or a dirty filter. Adjusting the pH and alkalinity, shocking the pool, and backwashing the filter are usually effective solutions.
Algae can quickly turn your pool green. Identify the type of algae (green, black, yellow) to determine the appropriate treatment. Algaecides are available, but often a thorough brushing and shocking are also necessary. Prevention is key – maintaining proper chemical balance is the best defense against algae.
Low pH or alkalinity can cause corrosion and scaling. Use pH increaser or alkalinity increaser to adjust the levels. Add chemicals gradually and re-test the water after each addition. Remember to follow the manufacturer's instructions.
If the pump isn’t priming (not drawing water), check the water level, the skimmer basket, and the pump lid. Make sure the lid is sealed properly. If the filter pressure is too high, backwash the filter or clean the cartridge. If these steps don’t resolve the issue, it’s time to call a professional. Some problems require specialized knowledge and equipment.


No comments yet. Be the first to share your thoughts!